Local development environments are a cornerstone to any web developer’s toolkit (unless you like endlessly uploading files via FTP whenever you want to check a small CSS update).
If you’re building a site using PHP and running a Windows machine, WAMP Server in an invaluable tool for running a local development environment off your laptop.
Mac users should check out MAMP (or MAMP PRO which does all this for you).
In it’s default setup, WAMP will run whatever website you have sitting in your c:/wamp/www folder when you go to http://localhost in your browser.
If you’re working on multiple projects it’s much more organised to separate each one into it’s own individual development environment with it’s own testing domain and folder structure which you can easily hook up to an independent version control repo.
In this tutorial we’ll create a new local dev site to run from http://project1/
Step 1 – Create your project root folder
First, you need to create your folder to run your project from.
Go to the folder c:/wamp/www and create a new folder called project1.
Step 2 – Set up your Virtual Host
- Go to C:\wamp\bin\apache\ apache2.4.9\conf\extra (note that the apache2.4.9 might be different on your setup depending what version you have installed on your machine. Just remember that the Apache folder is the one you need to go in!)
- Open httpd-vhosts.conf
- Look for the default settings for localhost
<VirtualHost *:80>
DocumentRoot "c:/wamp/www/"
ServerName localhost
ServerAlias www.localhost
</VirtualHost>
- Copy this and paste it below the default settings and replace all your references to localhost with project1. Also make sure the DocumentRoot value points to your new folder you just created like so…
<VirtualHost *:80>
DocumentRoot "c:/wamp/www/project1/"
ServerName project1
ServerAlias www. project1
</VirtualHost>
Step 3 – Update your hosts file
Next you need to set your local DNS so your URL points to your new folder on your local server.
- Right click on the Notepad app icon and select more > run as administrator. If you are not running as an admin you won’t be able to save your updates.
- Go file > open and navigate to C:\Windows\System32\ drivers\etc
- This will likely show up an empty folder because the dialogie box will only lists text files by default. In the bottom right corner of the [box] change the Text Documents (*.txt) value in the dropdown box to All Files (*.*)

- Open your hosts file
- You’ll see the line 127.0.0.1 localhost
- Copy this and paste it on a new line and as before simply replace localhost with project1.
- Save the file and close it.
The updated file should look like this…
127.0.0.1 localhost
127.0.0.1 project1
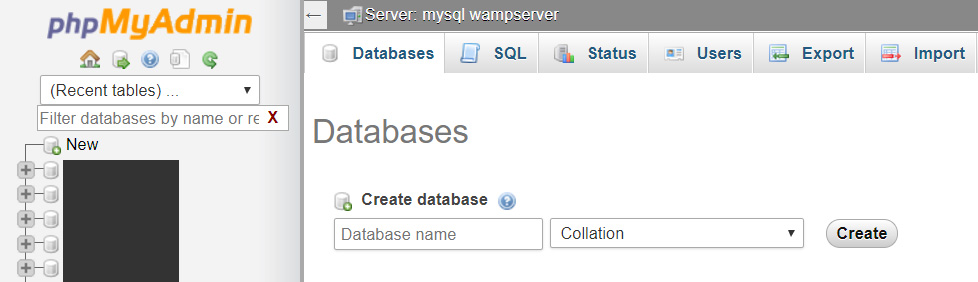
Step 4 – Create a new database
If you don’t need a database skip straight to step 5.
- Activate WAMP server if it’s not already running.
- Click on the WAMP toolbar icon in the bottom right of your screen and then select phpMyAdmin
- The left column of phpMyAdmin lists all your existing databases. At the top of this list, click on New.
- In the Create Database field, give your database a name and hit create.
This will create your empty database.
Step 5 – Restart all services
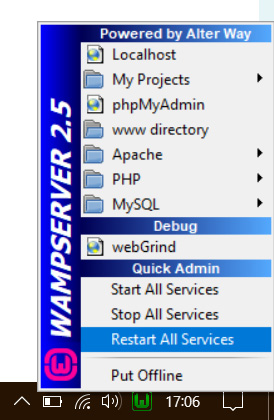
- Activate WAMP server if it’s not already running
- Click on the WAMP toolbar icon (if the server is running correctly it should be green) and click on Restart All Services.
- The icon will turn to red, then orange and the green again.
That’s it! Go to http://project1/ and your local dev site should be up and running. Simply stick your website files in the project1 folder you created earlier and your development server will be visible at the URL you chose.
Note that if you’ve already looked at http://project1 before updating your hosts file you may get an error as your old DNS may still be cached in your browser. In this case you’ll need to flush your DNS on your machine. Close your browser, open your command prompt app and then type
ipconfig /flushdnsAlternatively, sometimes simply clearing your browser cache (ctrl+F5) can do the trick too.
Note for WordPress
If you’re setting up a local WordPress website, unless you’ve already configured phpMyAdmin the default username is root and the password box should be left empty. The database host can be left as localhost.
